Friday, December 28, 2012

Post Christmas Wrap Up

I hope everyone had a wonderful Christmas and got to spend time with the people they love and eat fabulous food! My Christmas consisted of a 4hr road trip to D's parents place and a lovely Christmas lunch at his sisters new house. Our furry child Izzy came with us and enjoyed getting into the Christmas spirit also.


In the end I brought chocolate rum balls, chocolate gingerbread macarons, chocolate sugar cookies filled with chocolate ganache and sticky gingerbread with royal icing. Wow so much chocolate!

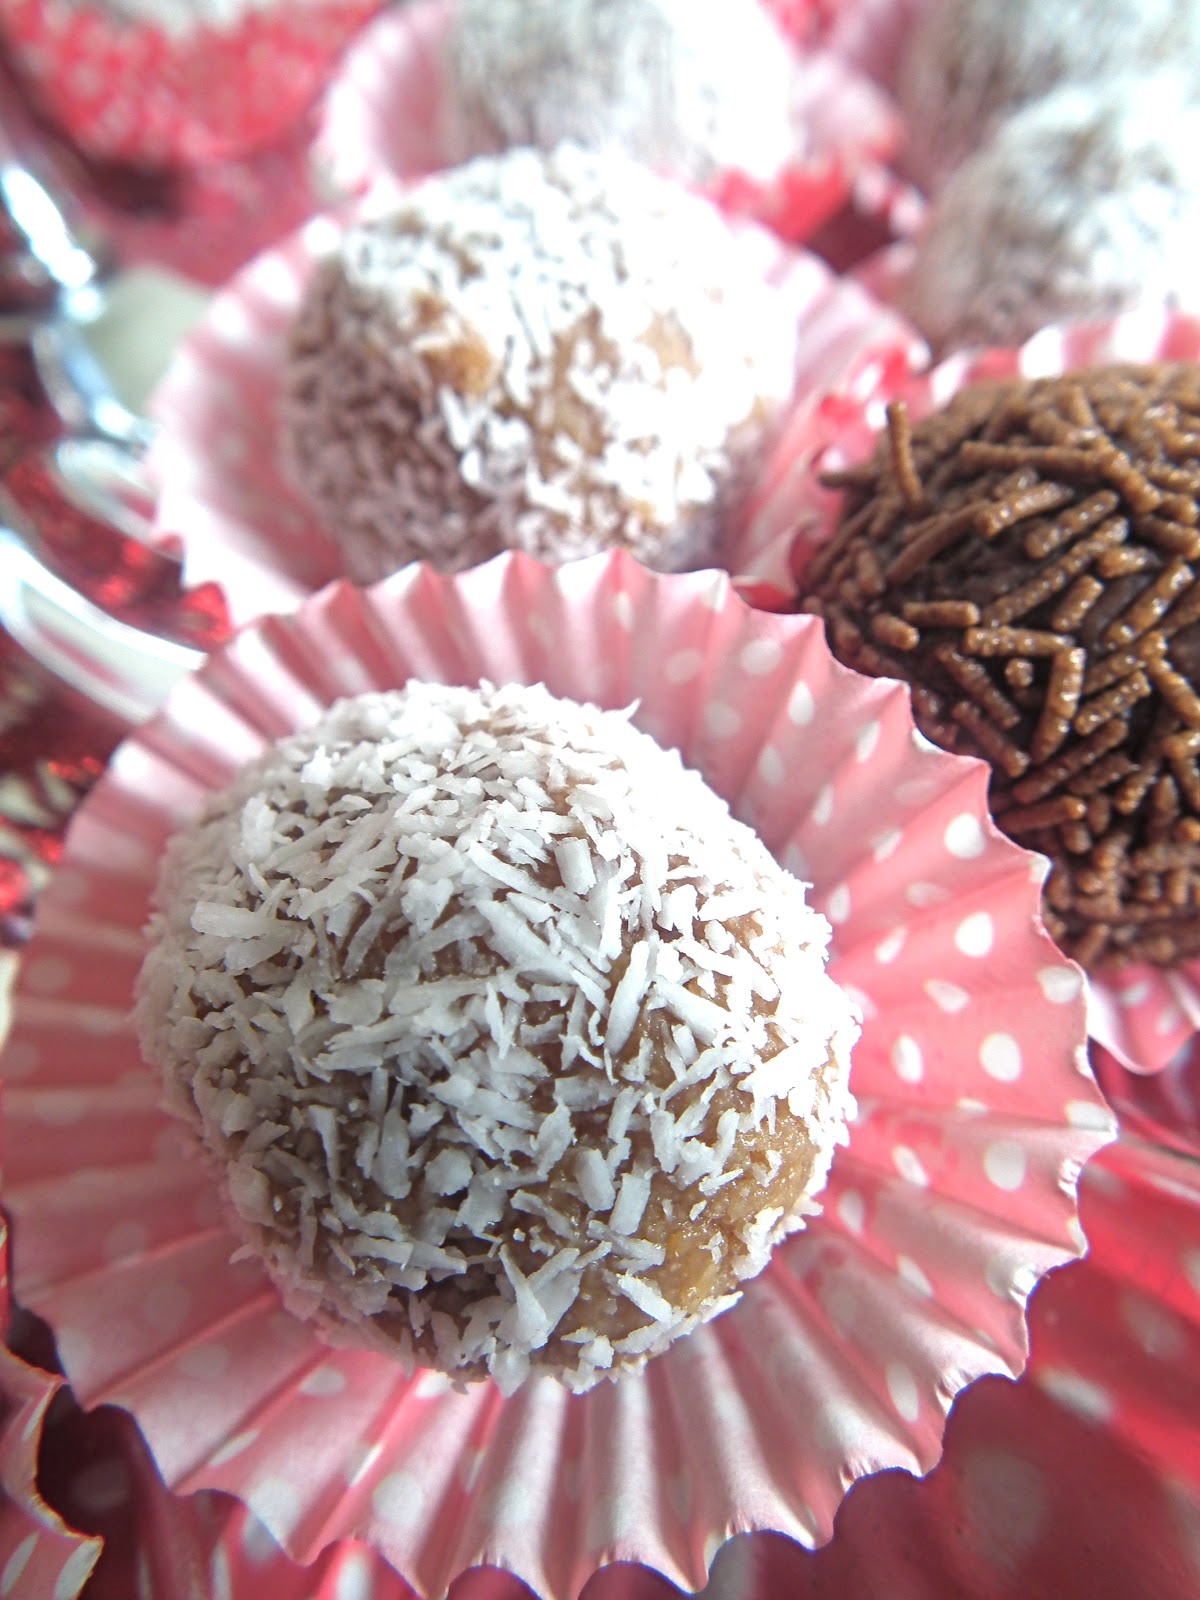
The rum balls I made using a basic rum ball recipe of:
1 packet milk arrow roots, crushed
1 tin condensed milk
1 cup coconut
1/2 cup cocoa
2 tbsp rum essence
And I added:
375g dark choc melts
All you have to do is place the chocolate in the food processor and pulse until crushed. Add to a bowl with milk arrow roots, condensed milk, coconut, cocoa and rum essence. Mix until combined. Roll into balls and roll in extra coconut. Store in the fridge but serve at room temperature as they tend to set quite hard.

For the macarons, I made the shells as per Candy Cane Macaron recipe. I left the mixture plain white but added stripes of green and red food gel colouring to the piping bag before filling with the macaron mix. The result was a wonderful candy cane looking macaron shell once piped and baked. I had seen this done at whiskitforabiscuit and was super impressed!


To make the chocolate gingerbread ganache, you will need:
1 1/2 cups chocolate melts
1/2 cup cream
2 tbsp golden syrup
1 tbsp ground ginger
1 tsp cloves
1 tsp mixed spice
All you need to do is heat the cream in a microwave for 1.5 minutes then pour over chocolate. Stir until smooth. Add the golden syrup, ginger, cloves and mixed spice. You may need to adjust the amounts of spices to suit your own tastes. Leave mixture to set to a thick consistency. Place in a piping bag and pipe onto half the macaron shells. Sandwich shells together. Store in the freezer and serve at room temperature.

Christmas is over now and we are back to life as per usual. I am trying to plan what the year ahead will have in store for Sugabuttacream and all I know for sure is it is going to be full of learning (baking, writing, photography etc) on my behalf and of course fabulous sugary sweetness!

Saturday, December 22, 2012

Sticky Gingerbread with Royal Icing


So my lovely mother gave me an early christmas present of Nigella's Christmas Cookbook. It is such a beautiful book with so many delicious recipes. I'd seen Nigella make this Sticky Gingerbread on one of her Christmas tv specials and it looked absolutely divine. I had decided not to make gingerbread men this year but still wanted that yummy ginger and spice aroma around the house so this recipe was perfect.


This cake-like treat is so moist and light you could very well get carried away and eat a whole lot before you even realise! When I came to make this recipe I realised I didn't have all the ingredients listed so I had to make some substitutes. The result was delicious! I wanted a contrasting icing so I thought of using royal icing that sets hard. That way there would be a crisp crust and a super soft cake underneath. That was the idea but turns out I didn't make the icing thick enough and it didn't really set as hard as I would have liked.


Sticky Gingerbread with Royal Icing

(adapted from Nigella's Christmas Cookbook)

What you will need


150 g butter
400 g golden syrup
125 g caster sugar
2 tsp finely grated ginger
1 tsp ground ginger
1 tsp ground mixed spice
1/4 tsp ground cloves
1 tsp bicarbonate of soda, dissolved in 2 tbsp warm water
250 ml milk
2 eggs lightly beaten
300g plain flour
1 packet Royal Icing

What you will need to do


Preheat oven to 170*C and line a lamington tin with baking paper. Place butter, syrup, sugar, gingers, spice and cloves in a saucepan until melted. Take off the heat and add milk, eggs and bicarbonate of soda. Add the flour and beat until mixed. Pour into the prepared tin and bake for approximately 30 minutes. When cooked it will be just firm to touch in the middle but still a but moist on top. Try not to overcook.

Cool in tin and then cut into squares. Place in fridge to cool right down. To make the royal icing, follow instructions on the packet by adding water in small amounts while beating. Use a palette knife and spread the icing over each piece.


Saturday, December 15, 2012

Chocolate Sugar Cookies with Cappuccino Filling


Christmas is sooooo close and I am super excited!! I've been baking like a mad woman and still have plenty more to make. A lot of the cooking won't make it to christmas, I'm a believer in celebrating Christmas all month or else Christmas day comes and goes way too quickly. So luckily with this yummy recipe I made the dough and put half in the freezer so I can whip some up the day before I head home for Christmas, clever me :) 


These are the most delicious sugar cookies I have ever tasted (well done Sweetapolita!). I put my own twist on them by filling them with a cappuccino flavoured icing which just made them amazing. They set really hard in the fridge so it is best to serve them at room temperature when the filling has softened a bit.


Chocolate Sugar Cookies with Cappuccino Filling

Recipe adapted from Sweetapolita

What you will need

6 cups plain flour
1 1/4 cups cocoa
1 tsp salt
454g butter, softened
2 cups caster sugar
1 cup brown sugar
3 eggs
2 tsp vanilla essence

For Cappuccino Filling
2 cups icing sugar
2 tbsp butter, softened
2 tbsp cappuccino liqueur

What you will need to do 

Place butter and sugars in a bowl and beat until light and creamy. Add eggs one at a time beating well after each addition. Add vanilla essence. Sift in flour, cocoa and salt and mix slowly until combined. Blend until mixture is even and smooth.

Divide mixture into two and place one half on a lightly floured surface. Shape into a disc, wrap in glad wrap and place in the fridge. Repeat with the second half of mixture. Leave in fridge for an hour or so until mixture has firmed up.

Preheat oven to 160*C. Line two baking trays with baking paper and set aside. Take mixture out of fridge, unwrap and place on a floured surface. Using a rolling pin roll dough out to a thickness of about 10 mm. Using a cookie cutter (what ever shape you like) cut out cookies and place them on the lined baking trays. You may need to use a knife or small spatula to lift cookies off bench. To cut holes in the middle of the cookies use a large end of a piping tip (Only cut holes in half of the cookies). It is best to do this once they are already on the tray so they keep their shape better. Cook cookies in oven for about 15 minutes or until they start to crisp up on edges. Take out of oven and leave on trays for a few minutes then transfer to wire rack.

To make the filling, place icing sugar and butter in a bowl and mix on low speed until combined. Add the cappuccino liqueur and beat on high until creamy texture. If mixture is too thick, add more liqueur, if it is too runny add more icing sugar. Place filling into a piping bag and pipe filling onto the biscuits without holes. Sandwich together the biscuits with filling with the biscuits without filling. Store in refrigerator, serve at room temperature.


Saturday, December 8, 2012

Candy Cane Macarons


It's about time I made some more macarons. My very first entry on this blog was for macarons and at that time I thought just about every entry afterwards would be for them too, but in reality it has taken months to make them again. I can promise you there will be at least one more macaron recipe before the end of the year although I won't give too much away just yet.


I decided to make these for a weekend trip back home to visit my parents. I won't be seeing them at Christmas so I thought I would bring something special for my visit. Originally I tried to make red shells, green shells and red and green swirled shells. Unfortunately I got a bit of water in my green shell mix and they did not turn out and my 'red' shells turned out pink :(. But alas they were still delicious and looked rather nice.


I decided on a buttercream filling mostly for cost effectiveness so I didn't have to buy chocolate, but it would have been totally delectable with a peppermint ganache filling. I used crushed candy canes in the buttercream which was nice but made it a bit difficult to pipe.


Candy Cane Macarons

This recipe is for one batch of macarons approx 30 shells (depending on size).

What you will need

1 cup icing sugar
3/4 cup almond meal
1/4 cup caster sugar
2 egg whites
red food colouring

For Buttercream (from Adriano Zumbo's Zumbo book)
100g caster sugar
38g water
75g lightly beaten eggs
45g egg yolks
200g butter, softened
3 candy canes

What you will need to do

MAKE SURE ALL EQUIPMENT IS DRY AND FREE FROM OIL BEFORE YOU START!
Line two baking trays with baking paper and set aside. Place the icing sugar and almond meal in a food processor and process until fine. Sift icing and almond meal into a bowl and set aside. Whisk egg whites until soft peaks form. Gradually add the caster sugar and whisk until sugar is completely dissolved and mixture is thick and glossy. Add food colouring and fold in until colour is even.

Put half the meringue mix into bowl with almond meal mix and mix roughly to remove air and incorporate all ingredients. Add remaining meringue mix and fold in until a lava-like consistency. You should be able to lift a spoonful of mixture and string it across the rest of the mixture and watch it disappear within 20 seconds.

Fill a piping bag with the mixture and pipe small rounds onto the baking trays. NOTE: I made two batches of macaron mix, one red and one green. I set aside about a third of each mix and filled a piping bag on one side with red and the other side with green to create a bit of a swirled effect when piped.

Take the baking trays and smack them onto a bench to expel any bubbles from the shells. I added cachous to some of my shells, now is the time to add them if you want. Leave trays to sit out on a bench until skin forms on the shells and you can gently touch them without it sticking to your finger. Preheat oven to 160*C.

When shells are ready, place in oven and bake for 10- 15 minutes or until you can see them slightly browning on the bottom. Remove from oven and leave on tray until cool to touch. Place shells on wire trays to fully cool down.

Meanwhile to make the butter cream, place sugar and water in a small saucepan over medium-low heat until sugar is dissolved. Increase heat to medium and cook until sugar reaches 121*C. Meanwhile whisk eggs and egg yolks on medium speed for 2 minutes. While still whisking, pour sugar syrup in a thin steady stream over egg mix until thick and cooled to 50*C. Slowly add the butter, a cube at a time, mixing well after each addition to make sure no lumps. Take the candy canes and break into small pieces (I placed them in a bag and beat them with a rolling pin). Stir candy canes through buttercream. I put the buttercream in the fridge to firm up for about an hour as is was quite soft. Place buttercream in a piping bag with a wide round nozzle and pipe onto half the shells. Sandwich shells with buttercream with those without and there you have it!


Saturday, December 1, 2012

Caramel Ginger Rum Balls and Chocolate Cappuccino Balls


It's CHRISTMAS TIME!! Christmas is my favourite time of year, to me it is a chance to enjoy the company of family and friends whilst indulging just a little. I have to confess that I actually started celebrating Christmas this year in mid November... I just got too excited from seeing all the beautiful decorations up around the shopping centres and decided Christmas was coming early this year!


I love to bake Christmas treats as gifts for my friends and family (and a couple cheeky treats just for myself). I usually stick with the classics like rum balls and gingerbread men, but I like to add a little twist. This year I made two variations of rum balls, Chocolate Cappuccino and Caramel Ginger.


Caramel Ginger Balls


What you will need


1 packet ginger nuts
2 cups coconut
1 tin caramel fill
1/3 cup Captain Morgan Spiced Rum
1 cup plain biscuit crumbs
Extra coconut for rolling

What you will need to do


Crush ginger nuts in a food processor until fine crumbs. Place in a bowl with coconut and plain biscuit crumbs. Add caramel and rum and mix until combined. The dough should not be too wet, if it is just add more plain biscuit crumbs. Also taste to see if the rum flavour is sufficient, you can add more or less depending on your own preference. Place the bowl of dough into the fridge to set for an hour.

Set up a bowl (I used a cake tin) and place about a cup of coconut in it. Set up a tray and place mini cupcake papers on it. Take out the bowl of dough and roll tablespoons of mixture into balls.


Place the balls into the bowl with coconut and roll around until completely covered.


Take the balls out of the coconut and place into mini cupcake papers.


Chocolate Cappuccino Balls


What you will need


1 packet Double Choc-Chip Biscuits
2 cups coconut
1 tin condensed milk
1/2 cup cocoa
1/2 cup plain biscuit crumbs
1/3 cup Cappuccino Liqueur
Chocolate sprinkles for rolling

What you will need to do


Crush the chocolate chip biscuits in a food processor until a fine crumb and place in a bowl. Add coconut, cocoa, plain biscuits and the condensed milk. Add the cappuccino liqueur to taste. If mixture is too wet add more plain biscuit crumbs. Place in fridge for an hour to firm up.

Set up a bowl (I used a cake tin) and place a small bag of chocolate sprinkles in it. Set up a tray and place mini cupcake papers on it. Take out the bowl of dough and roll tablespoons of mixture into balls. Place the balls into the bowl with sprinkles and roll around until completely covered. Take the balls out of the sprinkles and place into mini cupcake papers.


Saturday, November 24, 2012

Moist and Light Banana Cake


If you like Sara-Lee banana cake, you will LOVE this recipe! When I think of banana cake, I want something light and moist and full of banana flavour, oh and of course cream cheese icing! I am pretty proud of this recipe because I pretty much developed it myself. I used my no chocolate brownie recipe as a base and turned it into a delicious banana cake.


I swear you will not be able to stop at one piece, it is so light you could eat the whole cake before feeling weighed down and sluggish. Cream cheese icing is the perfect match for any banana cake and normally I would make my own from scratch. However I found Philidelphia Cream Cheese Frosting on sale at the supermarket and thought I would give it a go. It tastes exactly the same as the icing I make and because it was on special it turned out cheaper too.


I sometimes think this would make a lovely pudding. If you made it in little ramekins and served it with warm caramel sauce and vanilla ice cream, mmmmmmmm yum! I'll have to give it a go one day :)


NOTE: Using the ripest bananas is best as the flavour is much stronger and creates a better texture in the cake. Also its a great way to use up over ripe bananas that are no longer good for eating. 


Moist and Light Banana Cake


What you will need


3 eggs
1 cup caster sugar
1/2 cup brown sugar
1 tsp vanilla
170g butter, melted
1 cup plain flour
1 tsp baking powder
1 tsp salt
4 ripe bananas, peeled and mashed
1/2 cup walnuts, crushed
Cream Cheese Frosting

What you will need to do


Preheat oven to 180*C. Line a square cake tin with baking paper. Beat eggs and sugars in a bowl until sugars are dissolved. Add vanilla butter, plain flour, baking powder and salt and mix until just combined. Fold in the bananas and walnuts. Pour cake mix into prepared tin. Bake in oven for approximately 30 minutes or until the middle is no longer wobbly. The middle will be very soft to touch and probably won't spring back when it's cooked but as long as it is not wobbly it will be fine. 

Take cake out and cool on wire rack. Once cool, wrap in plastic wrap and place in freezer (the cake is so soft that it is a lot easier to ice when it is frozen firm). When the cake is firm to touch, take out of freezer and ice with cream cheese frosting.


Friday, November 16, 2012

Boozey Chocolate Crackles


I must admit I was never a huge fan of chocolate crackles. I felt cheated because they looked so chocolatey but were not actually made with chocolate :(. I hadn't made them since I was very young and had never really had the urge to until now. 


I was watching TV and saw a little girl eating one. It looked so delicious I just had to have one. I decided  that I needed to put an adult twist on the recipe as they are a bit childish. The answer, RUM! But not just any rum, Captain Morgan Spiced Rum. I've recently been introduced to this Puerto Rican rum and I've never looked back.


The rum gives a delicious taste to these crackles and certainly makes them ADULT ONLY! I wish I had have added some colour to these crackles as they do look a little bland. Maybe I could have just used colourful papers to brighten them up a bit. All these things I will take into consideration next time, but you can learn from my hindsight.


Boozey Chocolate Crackles


(Recipe adapted from the back of the Rice Bubbles Box and here)

What you will need


4 cups Rice Bubbles
250g Copha
1 cup icing sugar
1 cup desicated coconut
3 tbsp cocoa
30mls Captain Morgan Rum


What you will need to do


Place cupcake papers on a baking tray and set aside. Place the copha in a saucepan over low heat and stir until melted. Set aside to cool slightly. Place rice bubbles, icing sugar, cocoa and coconut in a large bowl. Add copha and rum and stir until combined. Spoon mixture into cupcake papers and place the tray in the fridge to set.

Although it may be tempting to eat them before they are completely set, I URGE you to let them set properly, they will taste so much better I promise!


Saturday, November 10, 2012

Chocolate Cupcakes with Buttercream Icing


So as you are all aware halloween was just the other week. I personally don't celebrate it, I never have and I don't even know the real story behind it. I acknowledge that others celebrate it, but I don't think it is something that will ever be a part of my life, but that's just me.


In saying that though, I had my first trick or treaters come to my house this halloween and they did look super cute. I felt bad when I said "I'm sorry but I don't have anything for you". One of the trick or treaters was the little girl next door and I felt especially bad. I decided to make her some little cupcakes the next day to make it up to her.


I really tried to make the icing purple, but my red-blue combination didn't exactly work :(. They did look a little ghost-like though (and a little dog-poop-like :S) but they tasted delicious, just ask me I ate about half the batch!


Chocolate Cupcakes with Buttercream Icing


(Recipe adapted from BestRecipes.com)

What you will need


3/4 cup self raising flour
1/4 cup cocoa
1 tsp instant coffee
1/2 cup caster sugar
1 tsp baking powder
1/2 tsp vanilla essence
80g butter
2 eggs
1/4 cup milk

For the buttercream icing
(Recipe adapted from RaspberriCupcakes.com)
4 egg whites
1 cup caster sugar
250g butter, room temperature
Food colours

What you will need to do


Preheat oven to 180*C. Prepare cupcake tray with cupcake papers. Sift dry ingredients into a bowl. Add butter, milk and eggs. Beat on medium speed until combined and smooth. Fill cupcake papers to about .5cm below the top. Place in oven for about 15 minutes or until cooked through.


For the buttercream icing, place the egg whites and sugar into a clean dry bowl. Place over saucepan of simmering water and whisk until mixture reaches 160*C and sugar is dissolved. Place mixture and food colour into the bowl of a mixer and whisk on high speed. Mixture will turn thick and cool down after about 5 minutes. Reduce to medium speed and start adding butter a spoonful at a time. Beat until completely incorporated then add another spoonful. At this point my icing was runny :( so I put it into the fridge for 10 minutes then beat it again until thick. Place it into a piping bag fitted with a round nozzle and pipe onto tops of cupcakes.


Sunday, November 4, 2012

Banana Pancakes


Mmmm pancake time! Fluffy pancakes are my favourite, there's nothing worse than a flat oily pancake, ew. I had some ripe bananas going to waste on my bench so I knew it was time for a banana recipe. I've never had a reliable fluffy pancake recipe until now. I love buttermilk pancakes but I never have buttermilk on hand when I feel like making them.


Banana Pancakes

(Recipe adjusted from Allrecipes.com)

What you will need


1 cup plain flour
1 tbsp baking powder
1 tbsp brown sugar
1 cup milk
1 tsp vinegar
3 egg yolks
3 egg whites
2 over ripe bananas, peeled and mashed with a fork
Oil and butter for frying


What you will need to do


In a small bowl combine milk and vinegar and set aside. In another bowl combine flour, baking powder and sugar. Add egg yolks, banana and milk mixture and stir until combined. In a separate bowl whisk egg whites until soft peaks form. Fold egg whites into the rest of the mixture. 

Heat a frypan to medium heat and add some oil and butter to cover the base. Using a scoop (or measuring cup in my case) put half a cup of mixture into frypan.


Cook for a few minutes until bubbles start to appear in the pancake. Using a spatula flip the pancake over.


Cook for a few minutes on the other side until brown.


Take out of pan and place on a plate covered in paper towel to absorb any extra oil. Repeat the process until all of the mixture is used. 

I served mine with cream and golden syrup but you can top with any of your favourite pancake toppings.


Wednesday, October 31, 2012

Mini Cookies and Cream White Chocolate Cheesecake


Ok so I saved the best for last, mini cookies and cream cheesecakes! Oreos make for the BEST chocolate cream biscuit to use for cookies and cream, I don't know what it is about them but they are simply the best (better than all the rest!). I decided to try something a little different with the bases this time and used a whole oreo cookie as the base. They fit perfectly into the bottoms of my cupcake tray!


One thing though, the edges of the cookie base went pretty soft after spending time in the fridge :( and some of the bases didn't come out of the tray very well. Next time I make them (and there will be plenty of next times!) I think I will make them in white cupcake papers. That way you wont lose any of the biscuit base when removing them from the tray. 


I found that these tasted better after being in the fridge for a couple of days. The cheesecake really firmed up and the cookie pieces went soft. Surprisingly the biscuit bottom stayed fairly firm, just the edges where there is no cream went soft. BTW how cute do the oreo bases look when cut open like that?? Yummo!!


This recipe also makes a great slice or cake so feel free to change it up. You will probably need to adjust the base but just follow this recipe for a solid oreo base. 


Mini Cookies and Cream White Chocolate Cheesecake


(Recipe adapted from Cookies and Cream Cheesecake from Nestle's Australia's Sweet Baking Favourites)

What you will need

 3 packets oreo biscuits
100g butter, melted
1 tsp gelatine
2 tbsp hot water
190g cream cheese
95ml condensed milk
150ml thickened cream
1/2 cup white chocolate, melted


What you will need to do

For the bases, place an oreo in the bottom of each cup in a silicone cupcake tray.

For the white chocolate cheesecake, place gelatin and hot water in a small bowl and mix until dissolved. In a separate bowl beat the cream cheese and condensed milk until smooth. Add cream, gelatin mix, melted white chocolate and beat until combined. Crush one and a half packets of oreos and add to the mix. Mix until combined. Spoon mixture on top of bases. Cut remaining oreos into quarters and place on top of each cheesecake. Place in fridge to set.