Wednesday, May 29, 2013

Choc-Peppermint Cake and Cupcakes


Peppermint isn't exactly my favourite flavour but with chocolate it's not so bad. Chocolate makes everything better really! I made this cake for a work friends birthday and wasn't around for the cutting of it hence no inside photos :( 

I used XXX Mints to flavour the icing and I put choc bits in it to give it a kind of choc-chip look, so I promise that's what the black bits are, not cake crumbs.

The chocolate cake recipe I used was one that has oil and vinegar instead of milk, butter and eggs. A bit different but I thought I would give it a go. The result was a dark moist chocolate cake and although there is 2 cups of sugar in it (!) not overly sweet (I think the cocoa has something to do with that). 

I decided to whip up some cupcakes and mini cupcakes as the recipe was quite large and my cake was small. They didn't take long to cook and came up beautifully!


Choc-Peppermint Cake

Recipe adapted from About.com

What you will need


2 1/2 cups plain flour
1/2 cup corn flour
2 cups caster sugar
Pinch of salt
2 tsp baking soda
10 tbsp cocoa
2 tsp vanilla
3/4 cup oil
2 tbsp vinegar
2 cups cold water

2 cups icing sugar
250g butter, room temperature
1 packet of XXX mints
Green food colouring
1/2 packet Choc Thins
Crushed Flakes for decoration

What you will need to do

Preheat oven to 180*C and prepare your tins and trays. I used one 4 inch mini springform cake tin, 20 cupcake papers and 24 mini cupcake papers but you could just make one large slab cake if preferred.

Sift all dry ingredients into a bowl. In a separate bowl place the vanilla, oil, vinegar and water. Add the wet ingredients to the dry and mix slowly until combined. Once combined, beat mixture until smooth. Fill cake tin and cupcakes 3/4 full. Bake cake for about 30-40 minutes until top springs back when touched. The cupcakes will take around 20-30 minutes and the mini cupcakes will only take about 8minutes.

Remove from oven and allow to cool. Meanwhile to make the icing, beat the icing sugar and butter together until light and creamy. Crush about 4 XXX mints until powdery and add the the icing. You can add more mints depending on how strong you want the flavour. Add a drop of green food colouring and beat. Add as much or as little until you reach your desired shade of green. Add the Choc Thins and mix until combined.

When the cake has cooled, slice into two halves. Place a dollop of icing on one half and spread it out. Place the other half of the cake on top and cover with icing. Place crushed Flakes on top for decoration. For the cupcakes, simply place remaining icing into a piping bag fitted with a round tip and pipe onto tops. You can sprinkle with some extra Choc Thins for decoration.


Saturday, May 18, 2013

Vanilla Flake Cupcakes


So ever since I made those delicious vanilla cupcakes a few weeks ago I have been on a bit of a mission to find a super moist cupcake recipe. Scrolling through Pinterest one day I stumbled across 'The Ultimate Vanilla Cupcake Tested by 50 Bakers and Counting'. This was a great place to start! 


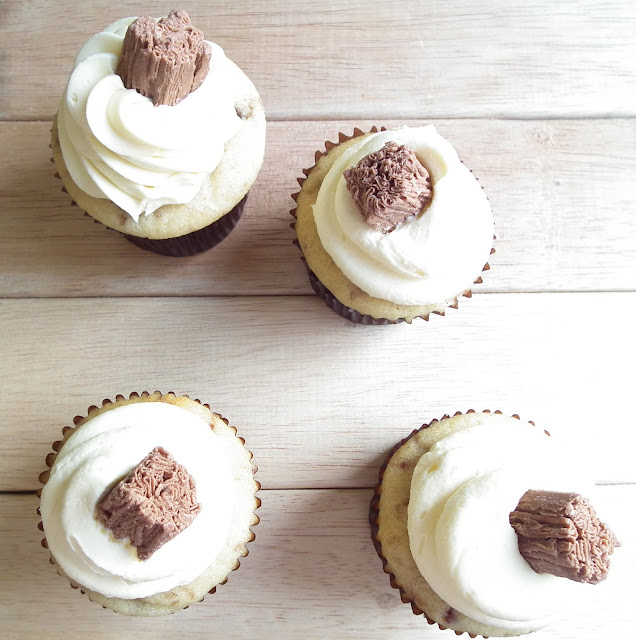
I wanted to make them for D's birthday so I decided to add some crumbled Flake bars to the mix to spice it up a bit. The cupcakes were super delicious and fairly moist, I still think I can get them more moist though. Topped off with vanilla buttercream and a mini flake they were ridiculously addictive and a huge hit.


Vanilla Flake Cupcakes


Adapted from The Cupcake Project - Ultimate Vanilla Cupcake

What you will need


1 cup caster sugar
1 3/4 cups cake flour (I used plain flour but replaced two tablespoons with corn flour)
1 1/2 tsp baking powder
1/2 tsp baking soda
1/2 tsp salt
1/4 cup unsalted butter, room temp
2 large eggs
1/3 cup sour cream
1/4 cup oil
1 tbsp vanilla
2/3 cup milk
1 packet mini flake bites

140g butter, room temp
170g icing sugar, may need extra
1 tsp vanilla

What you will need to do


Preheat oven to 175*C and prepare a muffin tray with cupcake wrappers. In a bowl combine flour, baking powder and soda, salt and sugar. Add butter and mix on a slow speed until the mixture resembles a fine crumb. In a separate bowl whisk eggs, sour cream, oil and vanilla until smooth. Add this mixture to the flour mixture and mix on medium speed until just combined. Slowly add the milk until just combined. Reserve 24 mini flake bites and crush the rest. Add to the batter and fold in.

Fill the cupcake liners half full. Bake for 15-20 minutes or until a toothpick inserted comes out clean. They shouldn't go brown on top so be cautious not to over cook them. When they are done put them on a cooling rack to cool.

To make the buttercream icing simply beat the butter and icing sugar on high until light and creamy. Add the vanilla and beat until well combined. You may need to adjust the amount of icing sugar depending on how soft you want it.

When the cupcakes have cooled simply pipe or spread on the icing. Place one mini flake bite on top of each cupcake. ENJOY!


Sunday, May 5, 2013

Malteser-Misu


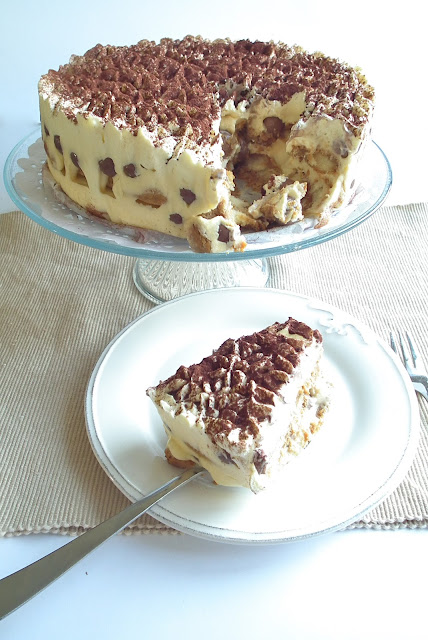
If there is one thing I cannot get enough of, it is Tiramisu. I love coffee and sweet creaminess so naturally I would. But sometimes it all just tastes like mush. If the sponge gets too soaked or the cream is too runny, the whole thing is becomes too much of a slop. So I decided it needed a crunch factor to balance out all the soft creaminess...enter maltesers.


 I added a sprinkling of maltesers on each layer of mascarpone cream so you should get a crunch with every bite. It worked really well, the maltesers added the crunch and a little chocolate without overpowering or taking away from the deliciousness of the tiramisu.


I made this in a cheesecake tin (the one with the removable sides) and was so relieved when it held its shape. Sometimes the cream is just a bit too soft and doesn't set, but this one did well, I removed the sides and it stayed put. I decorated the top with some sweetened whipped cream pipped into little swirls all over. Finish with a sprinkle of cocoa and your done!


Malteser-Misu

Recipe adapted from Taste.com

What you will need


1 packet sponge finger biscuits
1 cup of strong black coffee
30ml coffee liqueur (optional)
3 egg yolks
6 tbsp caster sugar
250g mascarpone cheese
300ml cream, lightly whipped
1 bag of maltesers

Extra 300ml cream + 1tbsp sugar
Cocoa to dust


What you will need to do


Place egg yolks and sugar in a heatproof bowl and place over a saucepan of lightly simmering water. Whisk until thick and increased in size. Take off the heat and fold in mascarpone cheese and cream.

Prepare a cheesecake tin by lining the bottom and sides with grease proof paper. In a shallow bowl mix the coffee and liqueur. Dip a sponge finger into the coffee and then place on the bottom of the prepared tin. Repeat with enough sponge fingers to line the whole bottom of the tin. Spread half of the mascarpone cream mix on top of the sponge. Sprinkle half of the maltesers over the cream. Repeat another layer of the sponge fingers then cream and then maltesers. Tap the side of the tin to help the cream fill any gaps.

Whisk the extra cream and sugar together until thick enough to hold its shape. Fill a piping bag fitted with a star tip with the cream and pipe stars all over the top. Dust with cocoa. Place in the fridge to set for a couple of hours. Once set, remove the side of the tin and peel back the paper to serve.


Wednesday, May 1, 2013

Vanilla Blitz Cupcakes


I have a confession. I don't love vanilla cupcakes. Well let me explain, I like making them and decorating them and seeing ones that others have created. But when it comes to eating them, let's just say there are a lot of other sweets I would choose to eat before I picked up a vanilla cupcake. I'm not sure where it comes from but I just think of vanilla cupcakes as dry and tasteless (except for the icing) or sometimes really 'eggy' flavoured. I'm not really selling you on this post am I?


However, it was my Boss' Birthday today so I decided to make some vanilla cupcakes because she is not a big sweet tooth but everyone needs cake on their birthday. So now I had the challenge of finding a recipe I could be proud of and that I would eat AND ENJOY myself. I remembered seeing mention of a Foolproof Cupcake Recipe on Raspberri Cupcakes (my fav blog) so I gave it a go.


Immediately it stopped me in my tracks when the first ingredient was mandarin juice... I hesitated...then thought what the hell I'll give it a go. And I am so glad I did! These are the perfect cupcakes, they brown up, round off and are light but not dry. You can't even taste the mandarin juice it just tastes like delicious perfection! The best part of all is that you can just throw all of the ingredients into the food processor and blitz it up in 2 minutes...UH-mazing!


Vanilla Blitz Cupcakes

Recipe adapted from Raspberri Cupcakes


What you will need


1/3 cup mandarin juice
2 eggs
125g unsalted butter
3/4 cup caster sugar
225g self raising flour
1/2 tsp vanilla

What you will need to do


Preheat oven to 180*C and line a muffin tray with baking papers.
Put all ingredients into a food processor and blitz for 2 minutes or until all is combined and smooth. It will be a fairly thick batter. Spoon mixture into baking papers about 1/2 or 2/3 full. Bake in oven for about 15 to 20 minutes or until tops have browned and spring back when touched. Take out of oven and cool on a cooling wire.

I made a quick buttercream icing using 100g of butter and beat it until soft and creamy. I then added about a cup of icing sugar and 1tsp of honey and beat until smooth and creamy. I added more icing sugar until it was the consistency I wanted for piping (not sure how much I used all up). When the cupcakes have cooled decorate them however you please. I piped roses using a large 2D tip.