Showing posts with label buttercream. Show all posts

Sunday, June 9, 2013

Pistachio Macarons with Chocolate Ganache and Vanilla Buttercream


It has been a while since I have made macarons. These turned out surprisingly well considering I tampered with the ingredients from my usual recipe and just added however much I wanted of pistachios. In fact the measurement of pistachios was 'however many I could peel before I got bored/annoyed/sore fingers'. I had intended to add some green food colouring to give them a more 'Pistachio' look but it completely escaped me. The ganache and buttercream was just left over from some cupcakes I made but it was super delicious sandwiched between pistachio macarons.


I've not been having a great time at work lately which is a shame because I love what I do. Throw in a bit of home sickness and my mood has been somewhat unpleasant to say the least. These little pick me ups make me feel a whole lot better both in the making and the eating. Creating these delicious little morsels from a few simple ingredients just gives me hope that one day this will be what I get to do day in day out :) And the fact that just one little bite can lift my mood to new heights is a pleasurable bonus!


Pistachio Macarons with Chocolate Ganache and Vanilla Buttercream


What you will need


3/4 cup almond meal
3/4 cup icing sugar
1/4 cup ground pistachios (I peeled/ shelled some pistachios then processed and sifted them, keep the bits that were too big to get through the sieve and set aside for later)
1/4 cup caster sugar
2 egg whites

200g chocolate melts
100ml cream

1 cup icing sugar
100g butter
2 tsp vanilla essence


What you will need to do


Prepare two baking trays with baking paper and set aside.
In a bowl sift the almond meal, icing sugar and ground pistachios and set aside. In another bowl beat the egg whites until soft peaks form. Add the caster sugar and beat until a thick merengue forms. Add the merengue into the sifted dry ingredients. Start mixing quite vigorously to combine ingredients and then fold until mixture is shiny and moves slowly in the bowl when tilted.

Place mixture into a piping bag fitted with a round tip about 1cm wide. Pipe small rounds onto the baking trays about 2cm wide (I made some extra small ones about 1cm wide too). Leave a good sized gap between each round as they will spread slightly. Tap the baking tray quite hard onto the bench to get any bubbles out of the rounds. Sprinkle the rounds with any leftover pistachio bits that were too big to get through the sieve. Leave the trays out on the bench for anywhere from 30 minutes to 2 hours, depending on the temperature and weather, until a dry skin forms on the rounds and you can touch them without it sticking to your finger.

Preheat the oven to 150*C and place trays in for about 10 minutes. They may need longer depending on your oven. The shells will be ready when the feet have formed and no longer look soft. They won't brown too much on top but the bottoms might just start to brown. Take out the trays and leave them to cool down on the tray. Once they are cool to touch remove them carefully from the baking tray and set on a wire rack to continue to cool.

To make the ganache, bring the cream to boil then pour over the chocolate in a heat proof bowl. Stir until all the chocolate has melted then set aside to cool down and firm up.

To make the buttercream, beat the butter and icing sugar until pale and creamy. Beat in the vanilla.

To fill the macarons, prepare a piping bag fitted with a round tip about 1cm wide. To fill the piping bag, holding it upright put the buttercream on one side of the bag and put ganache on the other side. This way you will get a swirled effect when you pipe. Pipe the filling onto half of the shells and then sandwich together with the other shells.

Tuesday, January 1, 2013

Sparkling Rose` Layer Cake: HAPPY NEW YEAR!


HAPPY NEW YEAR!! I hope everyone had a wonderful NYE, I found myself taking in the local fireworks at Reid Park a little sleep deprived and slightly cranky but I enjoyed it all the same. It was a good time to reflect upon the year that was and all the great things that happened. Highlights for me included:

               - Starting Sugarbuttacream!
               - Buying my first car
               - Starting my Bakers Apprenticeship

           
For this occasion I decided to bring out the big guns (ie my fancy piping skills and a layer cake!) and make this gorgeous Sparkling Rose` Layer Cake. I've seen this recipe at Whiskitforabiscuit and I knew I just had to try it and when I received a bottle of Sparkling Rose` from my boss around Christmas time I decided to save it for this very recipe. Sweetapolita gave me inspiration to decorate it with ruffles! I got the sides alright but I think I need to work on the top ruffles, it might be time to invest in a bigger petal tip!


Well I can't do a new year post without mentioning some goals for 2013. I plan to work harder on this blog to bring you more creative and adventurous recipes, at least once a week. I also want to learn more skills in baking and decorating wonderful cakes and sweets and how to photograph them beautifully.

I want to thank everyone who has helped me out this past year and supported me in everything i've done. My family, especially Mum, who follows my blog and tries out my recipes. My partner D who helps me eat all the sugar loaded foods I create so that my pants don't get too tight. And the whole blogging community who inspires me with their creations and stories. THANKS :)


Sparkling Rose` Layer Cake

(Adapted from Whiskitforabiscuit)

What you will need

3 cups plain flour, minus 3 tbsp
3 tbsp corn flour
1 1/2 tsp baking powder
3/4 tsp baking soda
1/2 tsp salt
170g butter, softened
1 1/2 cups sugar
6 egg whites
2 cups Sparkling Rose`
Red gel food colouring

For the buttercream filling (and crumb coat)
2 cups icing sugar
3 tbsp butter, softened
2 tbsp Sparkling Rose`

For the buttercream icing
750g icing sugar
400g butter
2 tsp vanilla
Red gel food colouring

What you will need to do


Preheat oven to 180*C and spray two cake tins (the same size) with oil and lightly flour. Beat butter and sugar until pale and creamy then add the red food colouring to reach desired tint. In a separate bowl sift together dry ingredients and set aside. Gradually add egg whites to butter and sugar mix and beat on medium. Don't be alarmed if the mixture looks curdled, it will be alright. Add to this the dry ingredients alternately with the Sparkling Rose` and mix until completely incorporated.

Divide mixture between the two cake tins evenly. Place in the oven and cook for 30-35 minutes or until set. Once cooked, remove from oven and cool in tins for about 10 minutes. Use a knife to loosen cakes around the edges and jiggle and tap tins on bench to make sure they are loose on the bottom. Turn cakes out onto wire rack and cool completely. Wrap cakes in plastic wrap and place in freezer until frozen. I find cakes are easier to cut and ice when they are frozen.

To make the buttercream filling, place ingredients in a bowl and beat until creamy and light. Remove cakes from freezer and using a large serrated knife cut each into two layers. Place a blob of buttercream on a cake board or plate that cake will be presented on and place the first cake layer securely on top. Cover this layer in buttercream about 5mm thick. Place next layer of cake on top and repeat until all layers are filled. When you get to the top, use the remaining buttercream to cover the top and sides of the cake, this will be your crumb layer to hold all the crumbs in. Place cake in fridge to set.

To make the buttercream icing, place ingredients in a bowl and bet until creamy and light, use as much colouring as needed to achieve desired tint. Remove cake from fridge. Cover the cake in a thin layer of the pink buttercream using just using a palette knife or spatula. To create the ruffle effect, put a petal tip in the end of a piping bag and fill bag with buttercream. Place tip at the bottom edge of the cake with the thin end of the petal tip facing out and the fat end touching the cake. In a side to side motion pipe the buttercream from the bottom to the top of the cake. Repeat this all around the outside of the cake. For the top, start on the outer rim and put the fat side of the petal tip towards the outside and the thin side of the petal tip towards the middle of the cake and pipe in a forward and back motion around the edge in a big circle. Repeat with consecutive circles getting closer to the middle. For a great tutorial just hit up you tube :)


Saturday, December 8, 2012

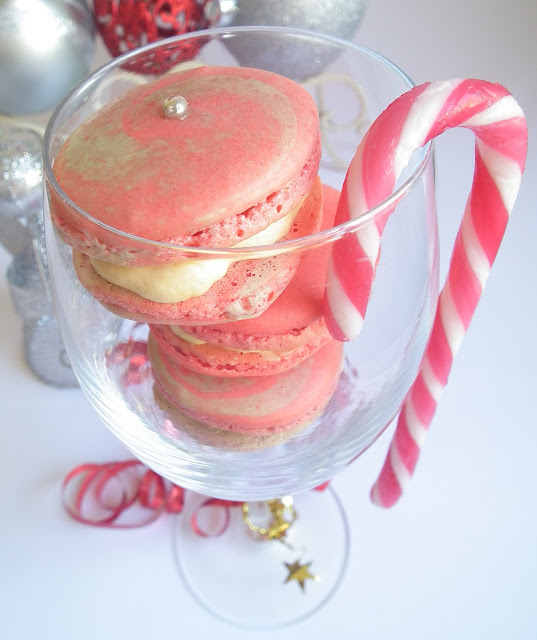
Candy Cane Macarons


It's about time I made some more macarons. My very first entry on this blog was for macarons and at that time I thought just about every entry afterwards would be for them too, but in reality it has taken months to make them again. I can promise you there will be at least one more macaron recipe before the end of the year although I won't give too much away just yet.


I decided to make these for a weekend trip back home to visit my parents. I won't be seeing them at Christmas so I thought I would bring something special for my visit. Originally I tried to make red shells, green shells and red and green swirled shells. Unfortunately I got a bit of water in my green shell mix and they did not turn out and my 'red' shells turned out pink :(. But alas they were still delicious and looked rather nice.


I decided on a buttercream filling mostly for cost effectiveness so I didn't have to buy chocolate, but it would have been totally delectable with a peppermint ganache filling. I used crushed candy canes in the buttercream which was nice but made it a bit difficult to pipe.


Candy Cane Macarons

This recipe is for one batch of macarons approx 30 shells (depending on size).

What you will need

1 cup icing sugar
3/4 cup almond meal
1/4 cup caster sugar
2 egg whites
red food colouring

For Buttercream (from Adriano Zumbo's Zumbo book)
100g caster sugar
38g water
75g lightly beaten eggs
45g egg yolks
200g butter, softened
3 candy canes

What you will need to do

MAKE SURE ALL EQUIPMENT IS DRY AND FREE FROM OIL BEFORE YOU START!
Line two baking trays with baking paper and set aside. Place the icing sugar and almond meal in a food processor and process until fine. Sift icing and almond meal into a bowl and set aside. Whisk egg whites until soft peaks form. Gradually add the caster sugar and whisk until sugar is completely dissolved and mixture is thick and glossy. Add food colouring and fold in until colour is even.

Put half the meringue mix into bowl with almond meal mix and mix roughly to remove air and incorporate all ingredients. Add remaining meringue mix and fold in until a lava-like consistency. You should be able to lift a spoonful of mixture and string it across the rest of the mixture and watch it disappear within 20 seconds.

Fill a piping bag with the mixture and pipe small rounds onto the baking trays. NOTE: I made two batches of macaron mix, one red and one green. I set aside about a third of each mix and filled a piping bag on one side with red and the other side with green to create a bit of a swirled effect when piped.

Take the baking trays and smack them onto a bench to expel any bubbles from the shells. I added cachous to some of my shells, now is the time to add them if you want. Leave trays to sit out on a bench until skin forms on the shells and you can gently touch them without it sticking to your finger. Preheat oven to 160*C.

When shells are ready, place in oven and bake for 10- 15 minutes or until you can see them slightly browning on the bottom. Remove from oven and leave on tray until cool to touch. Place shells on wire trays to fully cool down.

Meanwhile to make the butter cream, place sugar and water in a small saucepan over medium-low heat until sugar is dissolved. Increase heat to medium and cook until sugar reaches 121*C. Meanwhile whisk eggs and egg yolks on medium speed for 2 minutes. While still whisking, pour sugar syrup in a thin steady stream over egg mix until thick and cooled to 50*C. Slowly add the butter, a cube at a time, mixing well after each addition to make sure no lumps. Take the candy canes and break into small pieces (I placed them in a bag and beat them with a rolling pin). Stir candy canes through buttercream. I put the buttercream in the fridge to firm up for about an hour as is was quite soft. Place buttercream in a piping bag with a wide round nozzle and pipe onto half the shells. Sandwich shells with buttercream with those without and there you have it!


Saturday, November 10, 2012

Chocolate Cupcakes with Buttercream Icing


So as you are all aware halloween was just the other week. I personally don't celebrate it, I never have and I don't even know the real story behind it. I acknowledge that others celebrate it, but I don't think it is something that will ever be a part of my life, but that's just me.


In saying that though, I had my first trick or treaters come to my house this halloween and they did look super cute. I felt bad when I said "I'm sorry but I don't have anything for you". One of the trick or treaters was the little girl next door and I felt especially bad. I decided to make her some little cupcakes the next day to make it up to her.


I really tried to make the icing purple, but my red-blue combination didn't exactly work :(. They did look a little ghost-like though (and a little dog-poop-like :S) but they tasted delicious, just ask me I ate about half the batch!


Chocolate Cupcakes with Buttercream Icing


(Recipe adapted from BestRecipes.com)

What you will need


3/4 cup self raising flour
1/4 cup cocoa
1 tsp instant coffee
1/2 cup caster sugar
1 tsp baking powder
1/2 tsp vanilla essence
80g butter
2 eggs
1/4 cup milk

For the buttercream icing
(Recipe adapted from RaspberriCupcakes.com)
4 egg whites
1 cup caster sugar
250g butter, room temperature
Food colours

What you will need to do


Preheat oven to 180*C. Prepare cupcake tray with cupcake papers. Sift dry ingredients into a bowl. Add butter, milk and eggs. Beat on medium speed until combined and smooth. Fill cupcake papers to about .5cm below the top. Place in oven for about 15 minutes or until cooked through.


For the buttercream icing, place the egg whites and sugar into a clean dry bowl. Place over saucepan of simmering water and whisk until mixture reaches 160*C and sugar is dissolved. Place mixture and food colour into the bowl of a mixer and whisk on high speed. Mixture will turn thick and cool down after about 5 minutes. Reduce to medium speed and start adding butter a spoonful at a time. Beat until completely incorporated then add another spoonful. At this point my icing was runny :( so I put it into the fridge for 10 minutes then beat it again until thick. Place it into a piping bag fitted with a round nozzle and pipe onto tops of cupcakes.